![]() Tool(s): Door SmartPart
Tool(s): Door SmartPart
Using the Elements tab, you can select and define settings for the elements of the ![]() Sectional Door SmartPart.
Sectional Door SmartPart.
Note: When you slowly move the cursor horizontally across the parameters, it changes to a double-headed arrow as soon as you reach the area between the parameter names and the boxes. Now you can change the width of this area.
Elements tab

Panels
Thickness: define the thickness of the panels by entering a value between 0.02 and 0.2 m.
Height of banding: define the height of banding; it must not exceed 5 cm.
Length of tongue/groove: the maximum value is 5cm.
Number: define up to ten panels.
Type: specify the door type you want to create by choosing Panels or Smooth.
Panels H / V: when you have set the type to Panels, you can define the number of horizontal and vertical panels by entering a value between 1 and 10.
Opened by %: enter a percentage by which the door is open.
Hardware
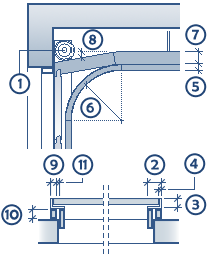
enter the dimensions (1-8) for the hardware.
You can see the dimensions in the graphics above.
Ceiling bracket: when you select this option, the up and over door is created with a ceiling bracket for the tracks. You can enter a value for the BL of ceiling, thus defining the length of the bracket.
Frame
Create: you can choose to create a frame.
Width / Depth: if you have selected the Create option, you can define the Width and Depth of the frame.
You can find information on the other tabs here:
You can find the following tools at the bottom of the palette:
Note: When you place or select a SmartPart, an arrow appears in the middle of the SmartPart, indicating the outside of the SmartPart. Depending on the position of the SmartPart within the opening, you can see another symbol, indicating that the SmartPart is mirrored before it is placed. You can set the size and color of these symbols using the Size of CursorTips for snap points and Color of CursorTips options you can find in the ![]() Options (Default toolbar), Point snap page, Point snap representation area.
Options (Default toolbar), Point snap page, Point snap representation area.
| (C) Allplan GmbH | Privacy policy |