 Match and paste text
You can enter text, make parameter settings and format text in this dialog box. To save text parameters in favorite files, see Saving text parameters as a favorite.
Tip: To close the dialog box and place the text in the workspace, you can also press CTRL+ENTER instead of clicking OK.
You can use ![]() Copy and Insert Text to copy an existing text directly into the current text entry routine. If text is selected, it is replaced by the text you clicked.
Copy and Insert Text to copy an existing text directly into the current text entry routine. If text is selected, it is replaced by the text you clicked.
You can use ![]() Text Favorites to save often used text as boilerplate and lets you retrieve boilerplate.
Text Favorites to save often used text as boilerplate and lets you retrieve boilerplate.
This ![]() cuts the selected text and puts it on the Clipboard. You can paste the text from the Clipboard into the text as often as you need using the Paste command. This command is not available when no text is selected.
cuts the selected text and puts it on the Clipboard. You can paste the text from the Clipboard into the text as often as you need using the Paste command. This command is not available when no text is selected.
This ![]() copies the selected text and puts it on the Clipboard. You can then paste it into the text as often as you need using the Paste command. This tool is only available when you have selected text.
copies the selected text and puts it on the Clipboard. You can then paste it into the text as often as you need using the Paste command. This tool is only available when you have selected text.
Clicking ![]() pastes the text from the Clipboard that you copied there using the Copy or Cut command. The text is inserted at the current cursor position in the text. If text is selected, it is replaced by the text you paste. You can paste the contents of the Clipboard as often as you need. This command is not available when the Clipboard is empty.
pastes the text from the Clipboard that you copied there using the Copy or Cut command. The text is inserted at the current cursor position in the text. If text is selected, it is replaced by the text you paste. You can paste the contents of the Clipboard as often as you need. This command is not available when the Clipboard is empty.
You can use the ![]() Delete tool to delete the selected text. You can also delete text using the Delete key. This command is not available when no text is selected.
Delete tool to delete the selected text. You can also delete text using the Delete key. This command is not available when no text is selected.
The ![]() Undo tool undoes the last operation you did in this dialog box. You can undo all the operations back to the point where you opened the dialog box.
Undo tool undoes the last operation you did in this dialog box. You can undo all the operations back to the point where you opened the dialog box.
You can use ![]() Redo to redo the last operation you undid with Undo.
Redo to redo the last operation you undid with Undo.
You can use ![]() Aspect to enter the text's aspect (height:width ratio). Only the text width changes. The text height remains constant.
Aspect to enter the text's aspect (height:width ratio). Only the text width changes. The text height remains constant.
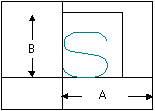
A: Width
B: Height
You can use ![]() Text Angle to define the angle at which text is placed here.
Text Angle to define the angle at which text is placed here.
You can use ![]() Column Angle (Indent) to enter the column angle in degrees here. Every new line of text is indented in accordance with the column angle specified.
Column Angle (Indent) to enter the column angle in degrees here. Every new line of text is indented in accordance with the column angle specified.
![]() Angle for Allplan font in italics
Angle for Allplan font in italics
You can use ![]() Angle for Italic-type Allplan Font to enter the angle which is used to display text shown in italics (only available with Allplan fonts).
Angle for Italic-type Allplan Font to enter the angle which is used to display text shown in italics (only available with Allplan fonts).
Click ![]() Open character map to open the Character Map.
Open character map to open the Character Map.
This is where you select the ISO code of a special character in the Allplan font. Clicking ![]() Insert special character pastes the special character at the current cursor position into the text.
Insert special character pastes the special character at the current cursor position into the text.
The ISO codes of the most important special characters are displayed in the list box. You can add characters by entering their corresponding numbers or by selecting a special character in the text.
This is where a preview of the special character you have selected in Character number is displayed. The Windows character set is used for this preview. This means that not all the characters contained in the Allplan font can be displayed.
Use ![]() Insert Special Character to insert the special character you have selected in Special character at the current cursor position in the text.
Insert Special Character to insert the special character you have selected in Special character at the current cursor position in the text.
You can use ![]() Copy Text Format to copy the format of a text that you click in the workspace.
Copy Text Format to copy the format of a text that you click in the workspace.
You can use ![]() Text Format Favorites to open a dialog box in which you can make text settings and save these settings as favorites (*.txfanx) and/or retrieve favorites you have already saved.
Text Format Favorites to open a dialog box in which you can make text settings and save these settings as favorites (*.txfanx) and/or retrieve favorites you have already saved.
Use ![]() Font to select the font you want to use.
Font to select the font you want to use.
You can use ![]() Text Height to enter the height of the text in [mm] or [inches]. See also Relationship between reference scale and text size.
Text Height to enter the height of the text in [mm] or [inches]. See also Relationship between reference scale and text size.
Use ![]() Bold to show text in bold. The text that is selected is shown in bold. If no text is selected, the text you enter subsequently is shown in bold until you quit the command.
Bold to show text in bold. The text that is selected is shown in bold. If no text is selected, the text you enter subsequently is shown in bold until you quit the command.
If the text you have selected is already shown in bold, clicking ![]() removes the Bold formatting. This option is not available with Allplan fonts.
removes the Bold formatting. This option is not available with Allplan fonts.
Use ![]() Italics to show text in italics. If the text you have selected is already shown in italics, clicking
Italics to show text in italics. If the text you have selected is already shown in italics, clicking ![]() removes the Italics formatting.
removes the Italics formatting.
Note: When you apply this format to Allplan fonts, the entire text is displayed in italics, regardless of the text you have selected. The angle is based on the setting under ![]() Angle for Italic-type Allplan Font .
Angle for Italic-type Allplan Font .
You can use ![]() Angle for Italic-type Allplan Font to enter the angle which is used to display text shown in italics (only available with Allplan fonts).
Angle for Italic-type Allplan Font to enter the angle which is used to display text shown in italics (only available with Allplan fonts).
You can use ![]() Underline to underline text. The text that is selected is underlined. If no text is selected, the text you enter subsequently is underlined until you quit the command. If the text you have selected is already underlined, clicking
Underline to underline text. The text that is selected is underlined. If no text is selected, the text you enter subsequently is underlined until you quit the command. If the text you have selected is already underlined, clicking ![]() removes the Underline formatting.
removes the Underline formatting.
![]() crosses text out. The text that is selected is crossed out. If no text is selected, the text you enter subsequently is crossed out until you quit the command. If the text you have selected is already crossed out, clicking
crosses text out. The text that is selected is crossed out. If no text is selected, the text you enter subsequently is crossed out until you quit the command. If the text you have selected is already crossed out, clicking ![]() removes the Cross Out formatting. This option is not available with Allplan fonts.
removes the Cross Out formatting. This option is not available with Allplan fonts.
Use this to define the text color. The text that is selected is given the color you specify.. If no text is selected, the text you enter subsequently is given the color set until you select a different color. The text color is only displayed in design viewports when Color stand for pen is disabled.

Color stands for pen means that the color used to display an element on screen is associated with (and thus dependent on) the pen thickness of the element in question. Elements drawn with a certain pen (or pen thickness) are always presented on-screen with the same color, regardless of the colors assigned to the individual elements. You can specify which color represents which pen in the ![]() Options (Standard toolbar) on the Desktop environment - Pen colors page. You can switch the Color stands for pen option on and off in
Options (Standard toolbar) on the Desktop environment - Pen colors page. You can switch the Color stands for pen option on and off in ![]() Show/Hide on the Standard toolbar.
Show/Hide on the Standard toolbar.
![]() encloses text in a box (square brackets). If text is selected, a box is applied around it. If no text is selected, the text you enter subsequently is bounded until you quit the command.
encloses text in a box (square brackets). If text is selected, a box is applied around it. If no text is selected, the text you enter subsequently is bounded until you quit the command.
![]() encloses text in a bubble (round brackets). If text is selected, a bubble is applied around it. If no text is selected, the text you enter subsequently is bounded until you quit the command.
encloses text in a bubble (round brackets). If text is selected, a bubble is applied around it. If no text is selected, the text you enter subsequently is bounded until you quit the command.
You can use ![]() Vert. Dividing Line to insert a vertical dividing line in text that is bounded by a box or bubble.
Vert. Dividing Line to insert a vertical dividing line in text that is bounded by a box or bubble.
![]()
Note: You can only use vertical dividing lines in conjunction with ![]() Text / Box or
Text / Box or ![]() Text / Bubble.
Text / Bubble.
The ![]() Apply background fill option applies blanking to the text you enter; in other words, a fill is applied around the text. This ensures that you can always read the text even if you have placed it on top of a pattern, for example. The fill is the color you have selected for Background color.
Apply background fill option applies blanking to the text you enter; in other words, a fill is applied around the text. This ensures that you can always read the text even if you have placed it on top of a pattern, for example. The fill is the color you have selected for Background color.
You can use Background color to specify the color that is used for ![]() Apply background fill. You can also set the background color in the Properties palette. There you can also choose to use the background color of the viewport instead; this is the color set in the
Apply background fill. You can also set the background color in the Properties palette. There you can also choose to use the background color of the viewport instead; this is the color set in the ![]() Options on the Desktop environment - Display page.
Options on the Desktop environment - Display page.
When ![]() Paragraph Text is switched on, all the text you enter while this is enabled is merged to a paragraph block. The spacing between the lines in paragraph text is always correct, regardless of reference scale.
Paragraph Text is switched on, all the text you enter while this is enabled is merged to a paragraph block. The spacing between the lines in paragraph text is always correct, regardless of reference scale.
When ![]() Border around paragraph text is selected, the paragraph text is enclosed in a border. You can define the properties of the border (color, pen thickness, line type, offset) in the Properties palette.
Border around paragraph text is selected, the paragraph text is enclosed in a border. You can define the properties of the border (color, pen thickness, line type, offset) in the Properties palette.
This is where you select the ![]() text's anchor point. You do so by clicking.
text's anchor point. You do so by clicking.
You can use ![]() Line Spacing tool to enter the line spacing. The line spacing is entered as a multiple of the text height.
Line Spacing tool to enter the line spacing. The line spacing is entered as a multiple of the text height.
You can use Expand toolbar to show or hide the icons for the text settings.
Constant size in layout (only in Properties palette)
If Constant size in layout is active, the size of text in layouts always stays the same, even if you change the scale of the layout element. If this option is not active, the size of text in layouts changes with the scale of the layout element.
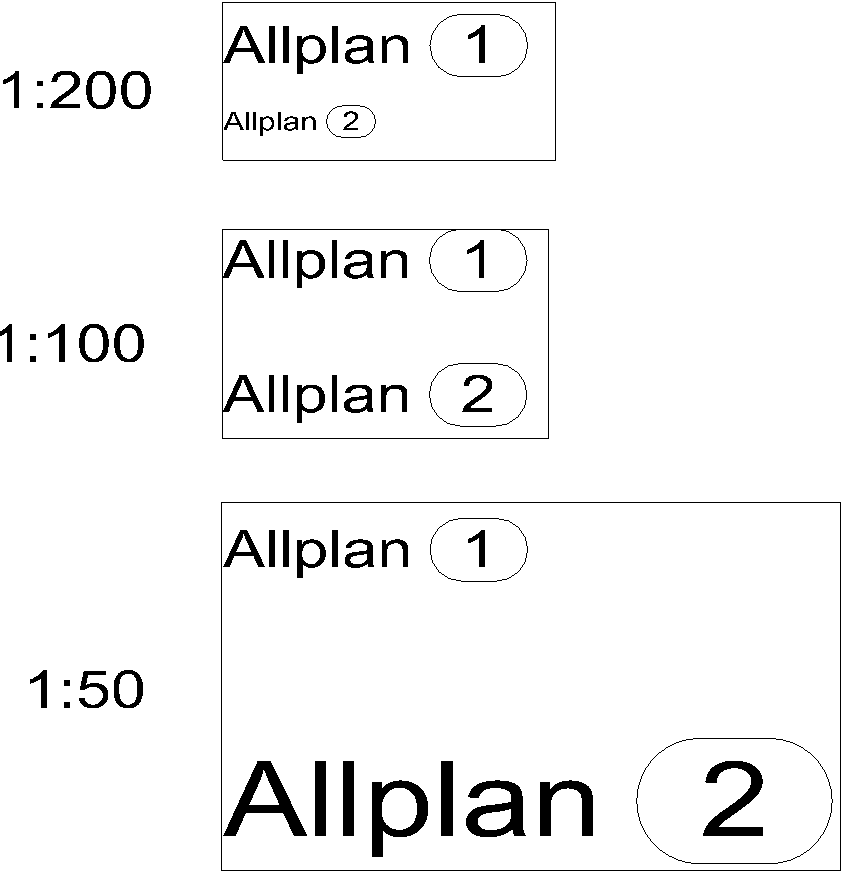
1 = constant in layout
2 = not constant in layout
| (C) Allplan GmbH | Privacy policy |
