![]() Palette for Window SmartParts + Window SmartParts
Palette for Window SmartParts + Window SmartParts
You can assign roller shutters to the ![]() Window SmartPart.
Window SmartPart.
Notes: You can insert a SmartPart for Roller shutters in a window opening if the top edge of the opening is horizontal.
If you assign roller shutters to a ![]() Window SmartPart, these elements are no longer treated as individual elements; they merge to form a single object. This has an effect on analyses using reports.
Window SmartPart, these elements are no longer treated as individual elements; they merge to form a single object. This has an effect on analyses using reports.
When you analyze Window SmartParts with roller shutters using the ![]() Reports tool, they are considered as a whole. You cannot analyze integrated roller shutters as separate elements.
Reports tool, they are considered as a whole. You cannot analyze integrated roller shutters as separate elements.
If you want to do this, you must create them as separate SmartParts for Roller shutters using the ![]() Shading SmartPart tool. Select Roller shutters in the list box at the top of the palette. You can then analyze these separate SmartParts for Roller shutters as individual elements using the
Shading SmartPart tool. Select Roller shutters in the list box at the top of the palette. You can then analyze these separate SmartParts for Roller shutters as individual elements using the ![]() Reports tool (Roller shutters.rdlc).
Reports tool (Roller shutters.rdlc).
Roller shutters tab
Settings
Fitting type: ![]()
![]()
![]()
![]() Front mounted: the roller shutter housing is attached to the masonry in front of the window or it is placed in the reveal.
Front mounted: the roller shutter housing is attached to the masonry in front of the window or it is placed in the reveal.
![]() Top mounted: the roller shutter housing is part of the window; it is placed on top of the window frame. Please note that this reduces the height of the actual window and thus the window area.
Top mounted: the roller shutter housing is part of the window; it is placed on top of the window frame. Please note that this reduces the height of the actual window and thus the window area.
Click ![]() to switch off roller shutters.
to switch off roller shutters.
Opened by %: you can enter a percentage by which the roller shutters are open.
Box
Height / Depth: you can enter the dimensions (height, depth) of the roller shutter housing.
Offset: you can define the distance between the front edge of the window and the front edge of the box.
Cross-section (![]() Rectangle,
Rectangle, ![]() Half-round): you can select the cross-sectional shape of the roller shutter housing.
Half-round): you can select the cross-sectional shape of the roller shutter housing.
Detect as plaster area: this option is only available for rectangular cross-sections. If you select it, the program adds the surface of the roller shutter housing on the exterior side of the wall to the plaster area. This option only has an effect if the roller shutter housing is flush with the wall. The program analyzes this option in ![]() Reports.
Reports.
Color: select the color for the box in 3D. If you have selected the Format from Layer option in the 3D representation area, you cannot select a color. In this case, the program takes the color from the layer set.
Surface: click the button to select a surface file for the box in 3D (SURF file format, Allplan surface file). Click ![]() to switch off surfaces.
to switch off surfaces.
Slats, rails
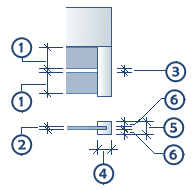
Height / Depth (1+2): you can enter the dimensions (height, depth) for the slats.
Offset (3): you can enter the distance between the slats.
Create rails: when you select this option, the rails are displayed and you can enter values for the width and depth of the rails.
Width / Depth (4+5): If you have selected the Create rails option, you can enter the dimensions of the rails.
Color: select the color for the slats and rails in 3D. If you have selected the Format from Layer option in the 3D representation area, you cannot select a color. In this case, the program takes the color from the layer set.
Surface: click the button to select a surface file for the slats and rails in 3D (SURF file format, Allplan surface file). Click ![]() to switch off surfaces.
to switch off surfaces.
2D representation
Layer: you can select the layer on which you want to place the roller shutters in 2D. The default setting for roller shutters is AR_SHAD.
Format from Layer: when you select this option, the settings for pen, line type and color are taken from the selected layer.
Pen / Line type / Color: when Format from Layer is not selected, you can choose the pen, line type and color.
3D representation
Layer: you can select the layer on which you want to place the roller shutters in 3D. The default setting for roller shutters is AR_SHAD.
Format from Layer: when you select this option, the settings for pen, line type and color are taken from the selected layer.
Note: If you select this option, the program ignores the Color you selected in the Box and Slats, Rails areas.
Pen / Line type: when Format from Layer is not selected, you can choose the pen and line type.
Note: The program uses the Color you selected in the Box and Slats, Rails areas.
Surface elements
By selecting one of the check boxes, you can assign a Hatching style, a Pattern, a Fill or a Style area to the surfaces in 3D.
| (C) Allplan GmbH | Privacy policy |
