What to do if outline auto-detect does not work?
 Entering polylines
Sometimes  Area detection does not work: instead of detecting the whole outline, the tool only places a point within the outline.
This is often due to the fact that the outline is not closed. There are usually some tiny gaps, which you can only see when you zoom in closely on the outline.
Do the following:
- First check that Area detection is on.
- Use the
 Element marker option to find the gaps in the polyline and close them.
 - Alternatively, you can temporarily change the minimum distance between points.
To make sure that area detection is on
- Open the tool that uses the polyline entry tools, such as
 Fill.
Fill. The Input Options toolbar of the polyline entry tools is displayed.
- Select the Polygonize elements check box.
- Select Area detection.
To find gaps in the polyline
- Area detection does not detect an outline. The gaps in the polyline need to be found and closed.
- On the Default toolbar, click Options.
- In the Options dialog box, click Desktop environment - Display.
- In the Element marker area, select the Element control symbol option and define its size.
Tip: You can also use  Show/Hide to switch the Element control symbol on and off.
This displays the start and end points of geometric elements such as lines or arcs. Control points of splines are also displayed.
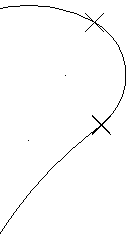
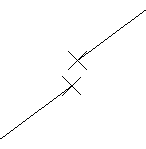
- Now zoom in on corners and connection points, in particular on splines, fillets, connections and so on.
Tip: Pay attention to element markers that appear "thick": it is very likely that there are two points directly beside one another.
- Close the gap using
 Stretch Entities or
  Intersect 2 Entities. You can also insert a short segment of a line.
 - Check whether the outline is now detected automatically. If it isn't, repeat steps 4 to 6.
- Switch the Element control symbol option off again.
To change the minimum distance between points
- Area detection does not detect an outline. You can increase the minimum distance between points so that the gap is ignored.
- On the Default toolbar, click Options.
- In the Options dialog box, click Desktop environment.
- In the General area, change the value of the Minimum distance between points option to 1 mm.
As a result, two points that are less than 1 mm apart are regarded as one point.
- Check whether the outline is now detected automatically.
Note: If the outline is still not detected, you can even specify a higher value for the minimum distance. However, you are advised to find and close the gap.
- Before you continue, it is essential that you reset the value of the Minimum distance between points to its default setting of 0.010 mm.
