Note: Although you can define up to 20 wall layers, you should not define all finishing layers (such as, plaster, paint and so on) as wall layers, thus slowing down your computer. Instead, use the finishing surfaces in ![]() Room and
Room and ![]() Story as usual. Similarly, use finishing surfaces of rooms for calculating areas and quantities (reports).
Story as usual. Similarly, use finishing surfaces of rooms for calculating areas and quantities (reports).
This area is only available when you modify components using ![]() Apply Archit. Component Properties or Properties on the shortcut menu (analogous to creation method).
Apply Archit. Component Properties or Properties on the shortcut menu (analogous to creation method).
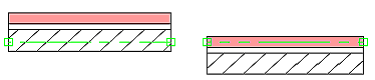
Preview, position of component axis
A schematic representation of the component is shown here. All the construction layers and the format properties selected as well as the surface settings you have made are displayed. In addition, you can position the component axis by dragging or entering values.
Layer number
This column displays the numbers of the individual construction layers.
Thickness, total thickness
You can enter a value for the thickness of each layer in the Thickness column.
Total thickness shows the sum of all construction layers in the wall.
Position
In this column, you can use icons to place the component axis in the individual construction layers or in the wall as a whole.
Height button
Click the Height button to define the height of the wall/upstand or, in the case of walls/upstands with multiple construction layers, the height of the first layer. You can define the height as an absolute value. You can also associate the height of the element with default or custom reference planes or relative to other building elements.
The height association of the component or of the first layer is represented by icons.
| (C) Allplan GmbH | Privacy policy |