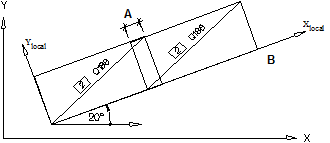
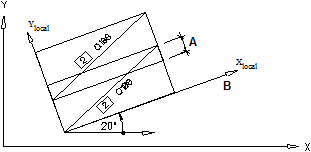
Setting the Mesh Overlap
There are two ways in which you can modify the mesh overlap:
- by entering the overlap length manually or
- by clicking an existing overlap label
The is understood as parallel to the local X-axis.
The is understood as being parallel to the local Y-axis.
Note: The Longitudinal Overlap and Transverse Overlap boxes are associated with the  Automatic Longitudinal Overlap and
  Automatic Transverse Overlap buttons, respectively.
- When you activate the Automatic Longitudinal Overlap button, Allplan will attempt to place only entire meshes in the longitudinal direction by increasing the longitudinal overlap evenly. The overlap will be increased by a maximum of 50%.
If this maximum value cannot be observed and you have selected cross-section catalogs containing meshes of the same type but with different lengths (e.g. Switzerland), Allplan will start by using the shorter, entire meshes. Then mesh sections (3/4, 2/3, 1/2, 1/3, 1/4) will be used. If the maximum is still exceeded, Allplan will place a mesh or excess mesh that keeps the exceeding value as low as possible.
When this setting is activated, the Round Off Meshes option is not available. - When you activate the Automatic Transverse Overlap button, only entire meshes are placed in the transverse direction and the transverse overlap is distributed evenly.