Correcting an area of a scanned image by entering three points
 Module(s): Scan
You can use the  3-Point Correct tool to correct an area of a scanned image by entering three points.
- When you employ the 3-Point Correct tool to re-align an area of the image, the file containing the image is also modified. You should therefore use
 Copy Image to make a backup copy first.
- Before you perform this operation, you should set the zoom factor so that the image is roughly the required size.
Use  Link with Scanned Image to do this and adjust the zoom factor as necessary.
To realign a scanned image by entering 3 points
- Click 3-Point Correct (How).
- Use the polyline entry tools to define the area you want to correct.
- Click the first initial point in the scanned image.
Note: The three reference points should not form an acute or obtuse angle.
- Click the corresponding target point.
- Repeat steps 3 and 4 for the second and third point.
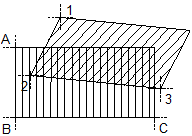
Legend:
1st reference point
A 1st target point
2nd reference point
B 2nd target point
3rd reference point
C 3rd target point

