Roof Beam
 Task area Roof
You can use this tool to create roof beams.
To place a roof beam
- Click
 Roof Beam (How).
 - Define the height in one of the following ways:
- Click on one of the rafters to which the roof beam is to be attached. Select the type of entry in the input options:
Spacng - enter the distance to the reference point (in plan)
Bottom - enter the height relative to the bottom of the roof beam
Top - enter the height relative to the top of the roof beam - Click a point in plan and enter the height of the top or bottom level at the keyboard.
You can also enter the height by clicking in one of the views: The height is automatically detected and displayed so that you can correct or accept it.
- If you want, you can now modify the roof beam parameters.
The context toolbar provides . - Place a start point and an end point for the roof beam.
- Specify the beam’s offset direction (left, right or middle - only applies when entering the beam using the Spacng option).
- Press ESC to quit the tool.
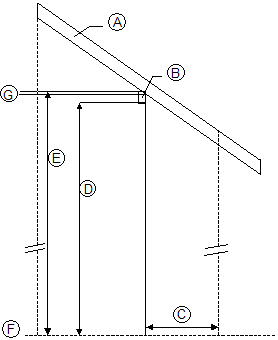
(A) Rafters
(B) Roof beam
(C) Spacng - enter a distance in plan (depends on the roof beam’s offset direction)
(D) Bottom - enter the height relative to the bottom of the roof beam
(E) Top - enter the height relative to the top of the roof beam
(F) Datum level (plan)
(G) Insertion depth of beam
Note: You can only define the insertion depth in the  Properties if you clicked a rafter when defining the height of the roof beam.
Note: If you only have the roof beam’s dimensions (width, height, and insertion depth) and you do not know the height at which to place the roof beam, ALLPLAN automatically calculates the position of the roof beam in plan. To do this, use Spacng, Bottom and Top in the input options.