![]() Tools: Roof Covering
Tools: Roof Covering
Overview of settings, preview (dialog box not expanded)
Number of layers
Select the number of layers for the roof covering (1 to 20).
Input type
![]()
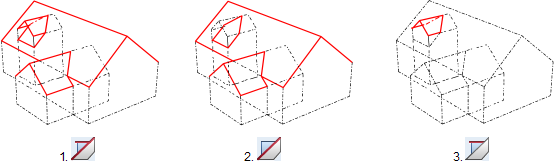
Select the roof frames over which you want to apply a roof covering:
![]()
Above all roof planes and dormer planes
(can be entered in a single operation; dormers with a roof overhang cannot be defined)
![]()
Fully bounded roof planes, such as dormers, are not taken into account
(dormers are cut out)
![]()
Only above fully bounded roof planes, such as dormers
(dormers must be fully bounded by roof;
dormers with a roof overhang can be defined)
The preview shows the different types.
Position
Relative height
Enter the distance between the bottom of the roof covering and the reference plane (positive value = above; negative value = below).
Select the Relative height button to open a dialog box, where you can link the roof covering to a plane in the current plane model or current drawing file. By clicking ![]() Match parameters (in the lower border of the Relative height dialog box), you can also use the height definition of another component for the roof covering. You can use the Offset box to enter the distance between the bottom of the roof covering and the reference plane (positive value = above; negative value = below). This is the offset that appears in the Roof Covering dialog box.
Match parameters (in the lower border of the Relative height dialog box), you can also use the height definition of another component for the roof covering. You can use the Offset box to enter the distance between the bottom of the roof covering and the reference plane (positive value = above; negative value = below). This is the offset that appears in the Roof Covering dialog box.
Polygon entered in plan indicates position of roof covering
Specify whether the entries you make for the roof covering in plan apply to the Top level or Bottom level of the roof covering.
You usually know the bottom level of the roof covering (for example, top level of rafters). Taking eaves flashing, angle and thickness of the roof covering into account, Allplan automatically calculates the projected position of the top level.
When you select Bottom level, the position in plan can differ from the position defined by the points clicked.
"Parameters, attributes" tab
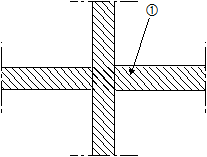
Eaves shape

Use this to select the tail cut.
Ridge shape

Use this to select the top cut.
You can use the following tools to rearrange the layers and to copy the properties of individual layers. You can also find these tools on the shortcut menu of the columns:
![]() Move to the top
Move to the top
![]() Move to the bottom
Move to the bottom
![]() Move up
Move up
![]() Move down
Move down
![]() Reverse setup of layers
Reverse setup of layers
![]() Copy layer and insert it before the selected line
Copy layer and insert it before the selected line
![]() Copy layer and insert it after the selected line
Copy layer and insert it after the selected line
![]() Remove selected lines
Remove selected lines
"Format properties" tab
![]() Pen,
Pen, ![]() Line,
Line, ![]() Color
Color
You can define the Format properties of the roof covering or of each layer (if the roof covering consists of multiple construction layers).
Note: The properties in the Properties palette have no effect on the roof covering; the settings you make here apply.
You can assign custom surfaces to the roof covering or, in the case of roof covering consisting of multiple construction layers, to each layer. You can also modify surfaces you have already assigned. These surfaces are visible in viewports of the Animation view type.
"Surface elements" tab
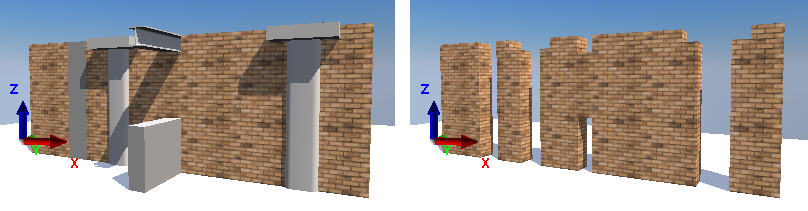
Note: You can display the structure of the roof covering in architectural sections. To define the necessary settings, select the ![]() Hidden-Line Image, Wireframe tool, click Hidden-Line Image and open the Formats palette.
Hidden-Line Image, Wireframe tool, click Hidden-Line Image and open the Formats palette.
"Total" tab
The Total tab consists of the Parameters, Attributes, Format properties and Surface elements tabs.
Buttons in the border of the dialog box
Note: The parameters can be ![]() saved as a favorite file and
saved as a favorite file and ![]() read back into the dialog box.
read back into the dialog box.
|
(C) ALLPLAN GmbH |
Privacy policy |