![]()
![]()
|
|
|
![]() Task area Components + Interior Finish
Task area Components + Interior Finish
You can use this tool to insert window openings in walls. You can then apply a Window SmartPart to this opening.
To create a window
Note: In the case of walls with multiple construction layers, it is advisable to click the wall first and then set the parameters for the window opening. This automatically enters the properties of the wall in the dialog box and presents the advanced options for multi-tier walls.
Tip: Click ![]() Get from Library to select and insert an opening that was created with the
Get from Library to select and insert an opening that was created with the ![]() Smart Window and Door Symbols tool (How).
Smart Window and Door Symbols tool (How).
A preview of the opening is attached to the crosshairs. You can see the direction of opening. (This is particularly important for openings in multi-layer walls where the offset value differs from layer to layer.)
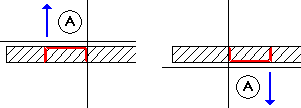
A Wall line clicked = exterior side of opening
Note: If Prompt for opening width is not selected on the Window Context toolbar, Allplan will create the opening using the width specified in the Properties dialog box without prompting you again.
Note: When the Place label option is selected on the Window Context toolbar, you can label the opening in the same manner as in the ![]() Label tool.
Label tool.
Note: For quantity takeoff in accordance with German building regulations, check that the openings are within the components.
|
(C) ALLPLAN GmbH |
Privacy policy |