![]()
![]()
|
|
|
When entering window openings and door openings in earlier versions, you could place the reveal completely inside or outside the opening.
Using ![]() Define, Modify Reveal, you could move the reveal partially outside the opening. However, the
Define, Modify Reveal, you could move the reveal partially outside the opening. However, the ![]() Restore 3D View tool with the Recreate option always set the reveal back to its default setting.
Restore 3D View tool with the Recreate option always set the reveal back to its default setting.
In Allplan 2015-1, you can now create a reveal which is partially outside the opening. The only requirement is that the reveal is in contact with the opening.
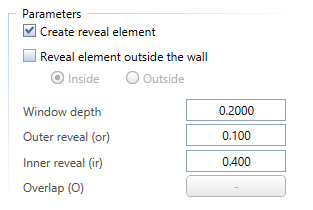
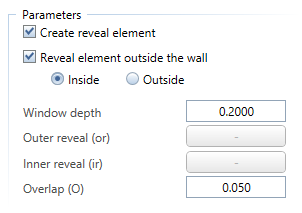
If you want to create the reveal partially outside the opening, you can use the Outer reveal and Inner reveal parameters. Please note that the value for Inner reveal includes the value for Window depth or Door depth.
Reveal partially on the outside
If you want the window to project from the exterior side of the wall, you can add the projecting part to the value for Inner reveal. The maximum value for Inner reveal is wall thickness plus window depth. As a result, Outer reveal is negative. Its value equals that of the projecting part.
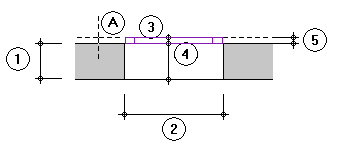
A Wall line clicked = exterior side of opening
1 Wall thickness
2 Opening width
3 Outer depth of reveal (negative; cannot be greater than depth of opening element 5)
4 Inner depth of reveal + projecting part (cannot be greater than depth of opening element 5)
5 Depth of opening element (for example, window or door)
Reveal partially on the inside
If you want the window to project from the interior side, you can enter the wall thickness for Outer reveal. As a result, Inner reveal is zero and the window is in contact with the interior side of the wall.
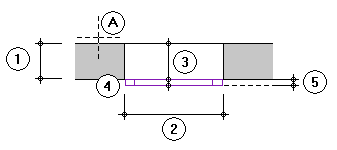
A Wall line clicked = exterior side of opening
1 Wall thickness
2 Opening width
3 Outer depth of reveal (cannot be greater than wall thickness)
4 Inner depth of reveal (is zero if outer reveal equals wall thickness)
5 Depth of opening element (for example, window or door)
You can use the following tools to create this kind of reveal:
| (C) Allplan GmbH | Privacy policy |
