![]() Tool(s): Light Settings
Tool(s): Light Settings
You can use this to define the position, target and type of any number of freely definable light sources. Each of these lights can be turned on and off individually (when placing or modifying the lights). You can also turn them all on/off at the same time. An overview of the number of lights that are on/off is displayed and you can define a color and line width for the light symbols.
To set user-defined light sources
A preview of the light source is displayed attached to the crosshairs.
The Light Information dialog box appears.
Tip: Check the height of the light source (Z coordinate).
Tip: When an animation window is open, you can click the Apply button to check the effects of your settings and modify them, if necessary.
The light source is displayed with the settings you made and the corresponding symbol.
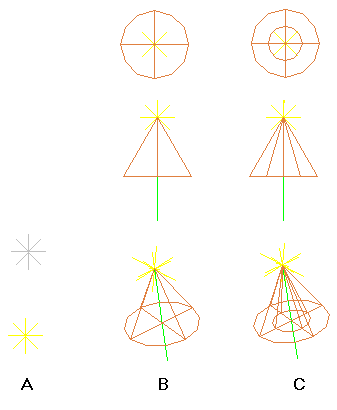
Point light, same display in plan, elevation and isometric view,
off and on
B Conical light, 60-degree angle (even light),
in plan, elevation and isometric view, on
C Spotlight, 60-degree angle (brighter indoors than outdoors)
in plan, elevation and isometric view, on
The Light Settings dialog box is displayed again.
Tip: When an animation window is open, you can click the Apply button to check the effects of all the light settings and modify them, if necessary.
| (C) Allplan GmbH | Privacy policy |

